A question came across my desk regarding retouch varnish this week. The artist wrote: “So I put retouch varnish to seal my painting. Where the areas has dark colors, the surface is dry. But where the areas are white, it’s still tacky. It’s been about 2 days now. Curious if you’ve dealt with this issue or know how to remedy?”
Since I don’t use it retouch varnish in my own process–I thought that the good folks over at the Painting Best Practices Facebook Page (admin: Natural Pigment’s Founder George O’Hanlon) might have been able to provide a good answer. (hint: they did.)
First, it turn out that a number of artists there felt that the component doing much of the heavy lifting in this non-drying scenario was the Titanium white. I personally have never had an issue with Titanium white drying exceptionally slow–but I do use it very sparingly.
Second, George O’Hanlon introduced another possibility. He stated: " It is quite possible that the solvent in the retouch varnish has “opened” the paint film. I have never heard of this happening before, bnut again, my experience with the material is EXTREMELY limited.
The solution put forward by George and others: Just wait. "At this point the artist should wait until the paint film is tack-free and dry. " Many were also quick to offer advice for future works: "Always wait for the paint film to become “hard dry”, not just “touch dry” before re-painting or applying a retouch varnish. (It is important to understand that the difference between “touch dry” and “hard dry” is not a matter of semantics. The terms denote stages of drying of organic coatings in ASTM D 1640 Standard Test Methods for Drying, Curing, or Film Formation of Organic Coatings at Room Temperature. While “touch dry” can be simply understood as dry-to-the-touch, the standard describes “hard dry” as the ability for a coating to resist a marking or deformation when the significant pressure is exerted on the surface with the end of the thumb.)
It was then that George put forward an additional option that I felt some here would find very interesting. He stated, "The artist can use an infrared lamp to accelerate the [drying] process, but I only recommend this as a last resort and with extreme caution. An infrared lamp can be placed in front of the area on the painting at a safe distance. Be sure and check that the paint film does not get hot. This must be monitored continuously—do not set this up and leave it without monitoring the painting.
To this suggestion of infrared light exposure, artist George Spencer added that the "oxidation of certain pigments is influenced by light so good light (such as a lamp or indirect sunlight may help). He also added a link to a study on the impact of light on the drying of pigments.
http://www.justpaint.org/impact-of-light-on-the-drying…/
Impact of Light on the Drying of Oil Paints: Initial Testing
By Sarah Sands for Just Paint (posted on April 23, 2018)
Oil paints dry through oxidization, so access to air seems clearly important, but what about light? How much does exposure to different light levels impact the drying process? Surprisingly, for a question that seems so basic and fundamental, there is not a lot of information or test data that one can find. While a few scattered studies do turn up in the literature, they are focused almost solely on the oil alone and are not based on a range of typical light levels and a variety of common colors. What follows describes some of the preliminary testing we have done in this area, and although there were no clear and definitive conclusions, we did end up with some tantalizing curiosities and patterns that can help inform best practices and provide areas for further investigation.
Test Layout
The testing included 10 Williamsburg Oil Colors chosen from three different drying categories and including both reactive and inert pigments:
- Fast : Raw Umber, Phthalo Green
- Medium : Cadmium Red Medium, Cobalt Blue, Ultramarine Blue, Titanium White, Titanium-Zinc White, Flake White
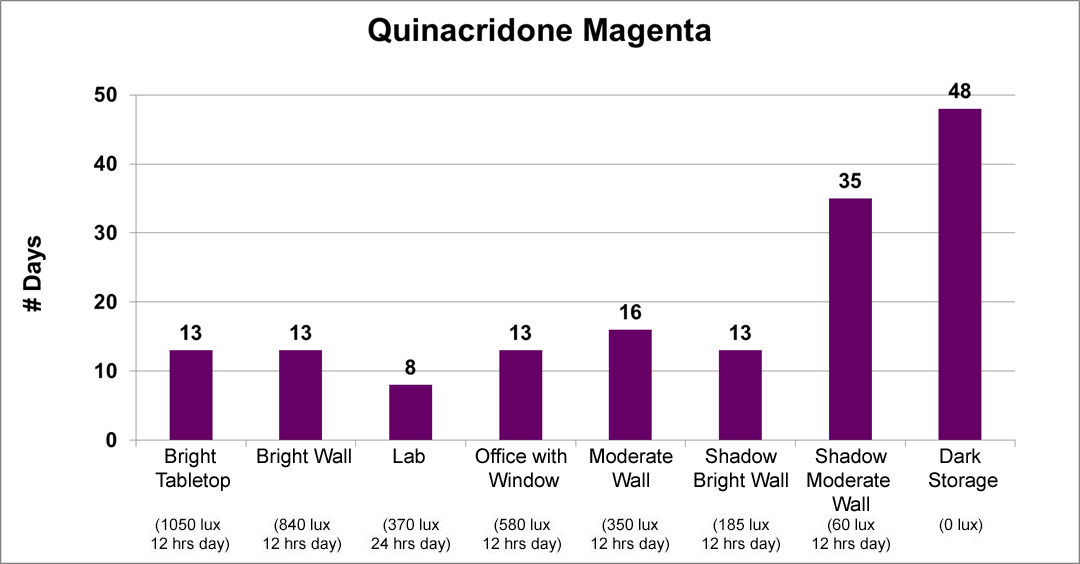
- Slow : Quinacridone Magenta, Lamp Black
These were applied as 6 mil drawn downs, about the thickness of two sheets of common copy paper, onto uncoated polyester film.
Samples were then placed in one of 8 different lighting situations. All lighting involved standard fluorescents, although the different types (daylight, cool, full=spectrum, etc.) were not controlled for. Lux levels, or the luminosity and brightness of the light, were measured using an Extech LED Light Meter.
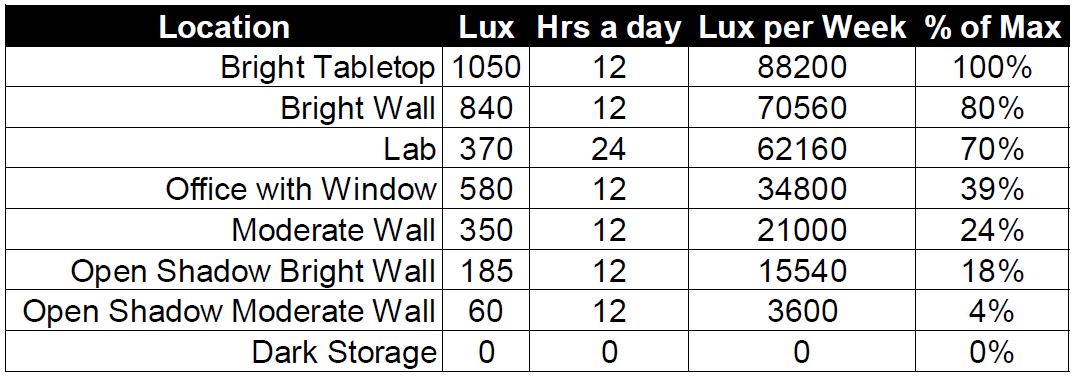
Lighting situations and the corresponding lux levels:
- Brightly lit table directly under light fixture (1050 lux)
- Brightly lit wall adjacent to table (840 lux)
- Office wall facing window (580 lux)
- Drying shelf in Lab (370 lux)
- Moderately lit wall (350 lux)
- Open shadow on brightly lit wall (185 lux)
- Open shadow on moderately lit wall (60 lux)
- Completely dark room (0 lux)
Weekly totals were then estimated based on the number of hours those particular lights would be on during a normal week.
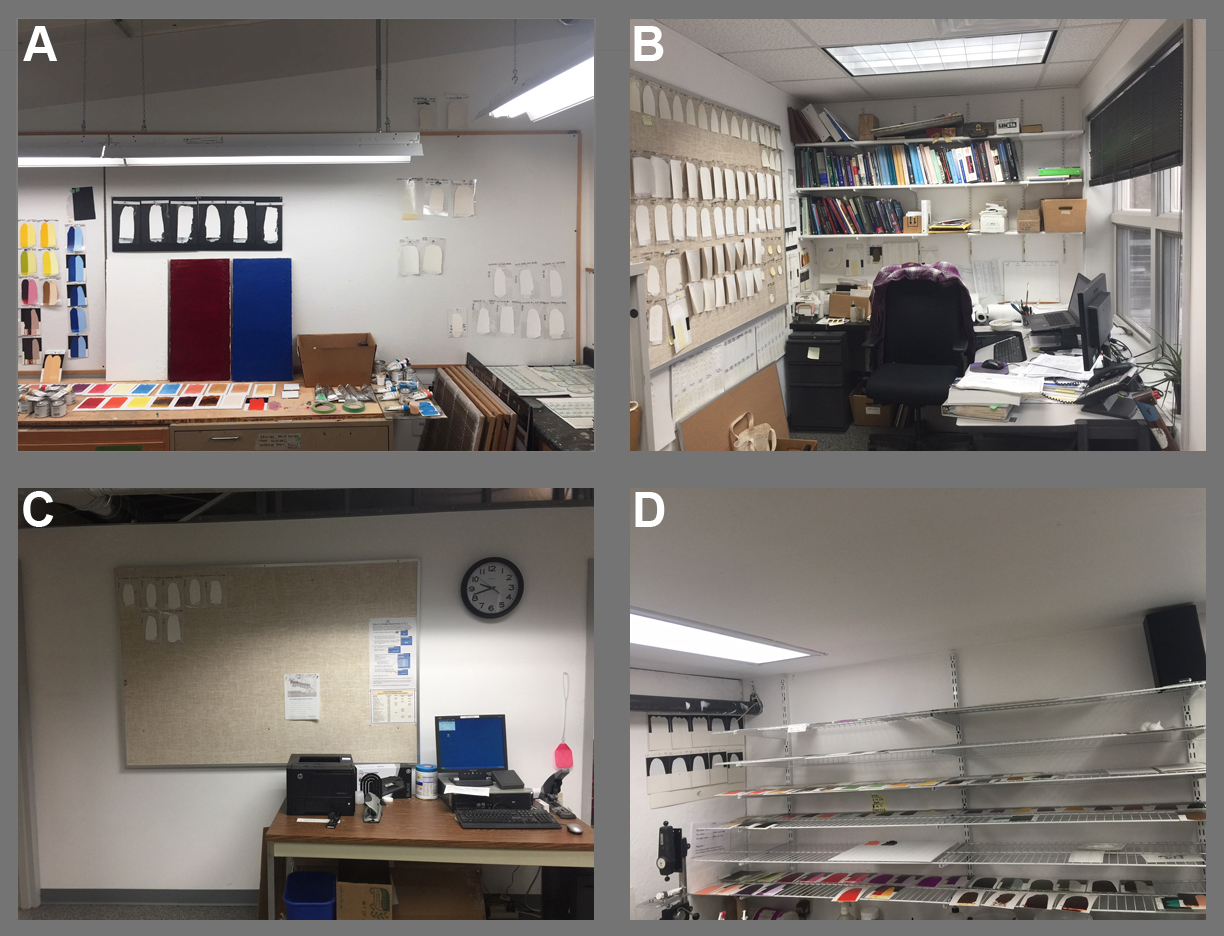
Test areas. A) Bright Table, Bright Wall with open shadow above lights B) Office with Window C) Moderate Wall with open shadow in upper left D) Lab with drying racks
Temperature and humidity were not controlled for, so any differences at the various locations were not taken into account.
A separate parallel study involved 6 mil drawdowns of Titanium-Zinc, with one sample placed in the dark room and additional samples transferred there after being exposed to either direct daylight or hung on the brightly lit wall for various intervals. This was to see if initiating the drying of a sample in the light impacted the length of time it took to finish drying in the dark.
Test Results
The test results, as you will see, contained more than a few surprises. Some colors were unaffected by the amount of light, drying at the same rate regardless of location, others showed a very moderate increase, while for a few the differences were dramatic.
First up are the five colors that were, for the most part, invariable: Cobalt Blue, Raw Umber, Phthalo Green, Ultramarine Blue, and Lamp Black:
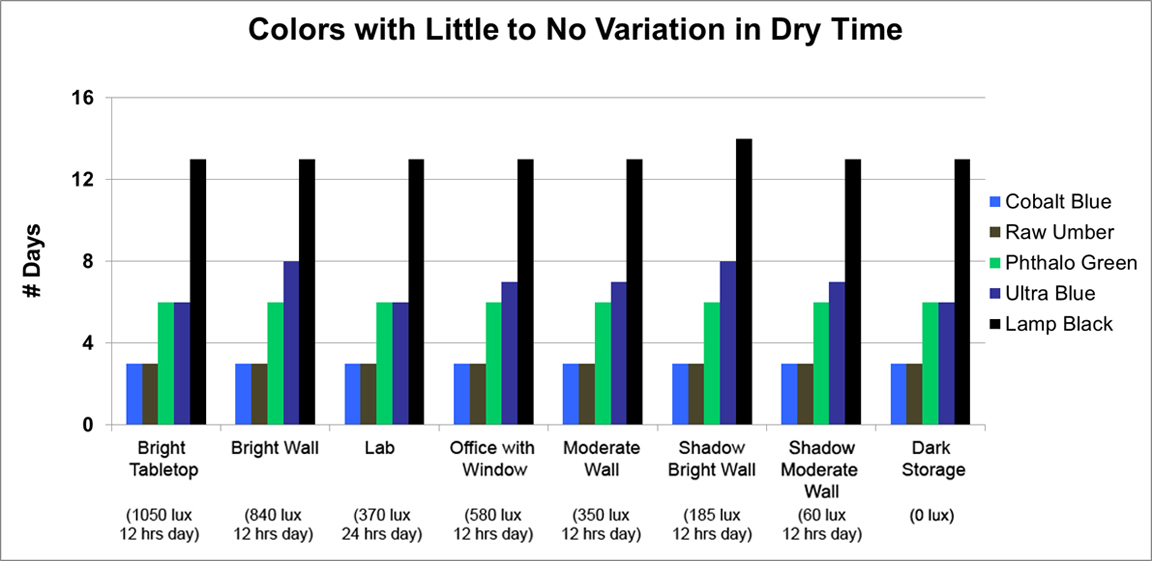
This is an unusual group by any measure. While the pigments in three of the colors (Cobalt Blue, Raw Umber, Phthalo Green) contain elements that can act as driers, such as cobalt, manganese and copper, making it is easy to think there might be an internal mechanism that allows them to kickstart the drying process on their own, this is not true of Ultramarine Blue or Lamp Black. Indeed Lamp Black is a notoriously slow drier and chemically inert, so one would assume it would be greatly impacted by light exposure, but it was amazingly consistent regardless of the amount of light.
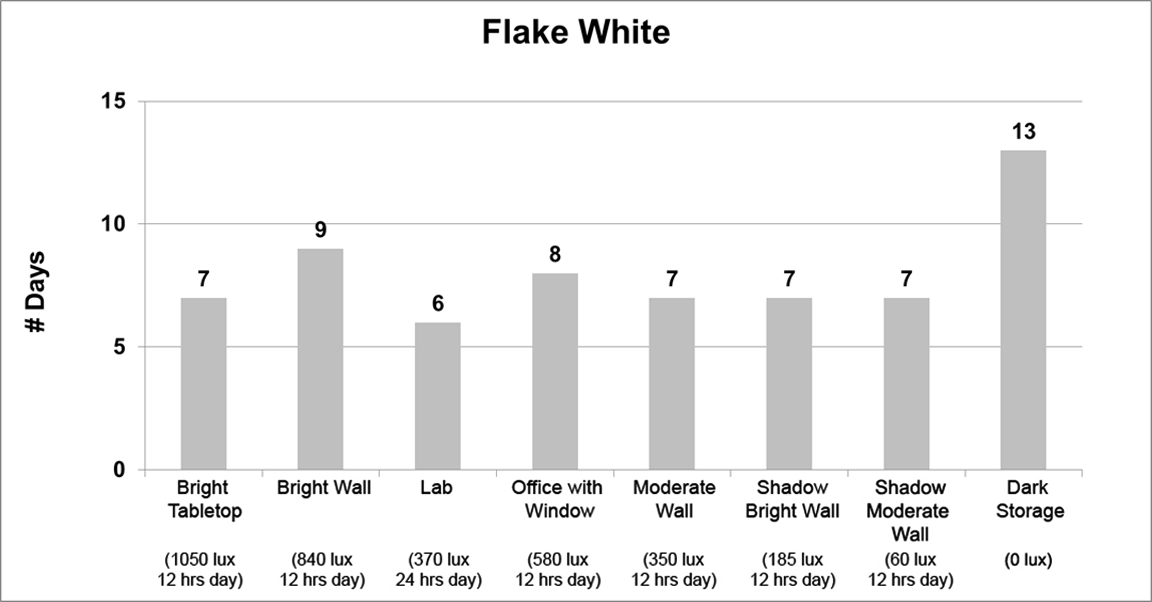
The second group is made up of just two colors, Flake White and Quinacridone Magenta. Under most circumstances, both these colors had fairly consistent dry-times, but showed a clear increase when placed in the dark or even in very subdued light, as in the case of Quinacridone Magenta. The variations in some of the data is most likely due to differences in sample preparation and where a particular sample was placed; although the sudden drop in drytime for the Quinacridone Magenta located in the Lab remains an unexplained anomaly.
Finally, the last three colors (Titanium White, Titanium-Zinc White, and Cadmium Red Medium) exhibited a strong correlation between light levels and dry times. As the light levels grew lower, the drying times steadily increased in a gradual and logical manner, ending with a very sharp spike in dry time when placed in the dark:

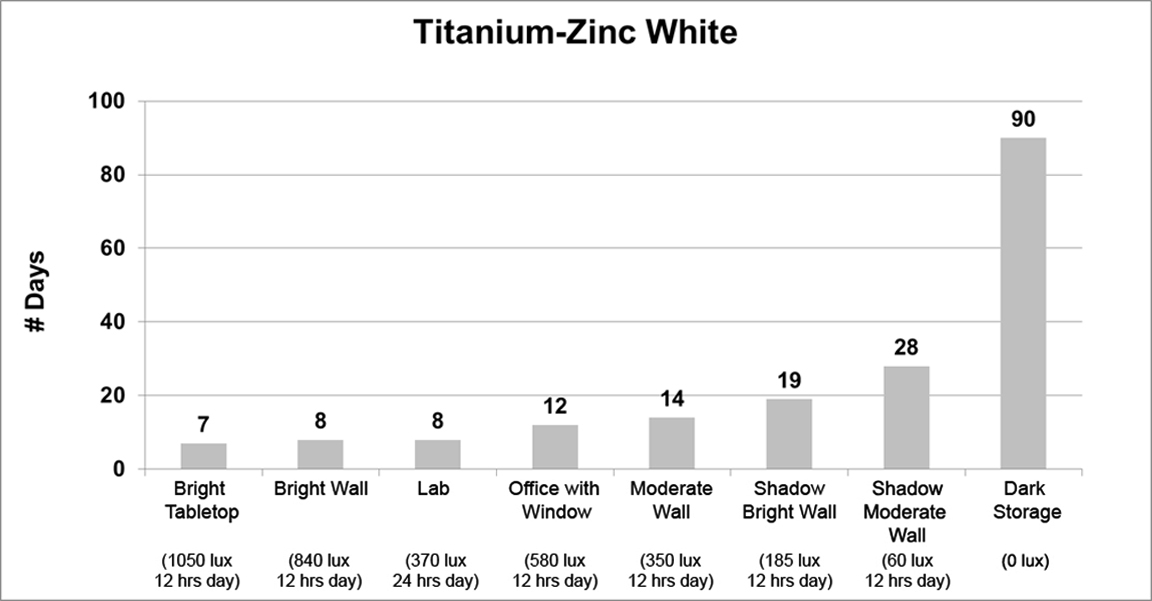

While both Titanium White and Titanium-Zinc dried 3 times slower in dark storage than the open shadow of a moderately lit wall, jumping from 7 to 22 and 28 to 90 days respectively, Cadmium Red Medium displayed an extraordinary increase in dry time, going from 16 to 135 days, or about 4 1/2 months.
Implications and Next Steps
We undertook this testing with the common assumption that light levels would impact dry times in some regular, predictable way that would be easy to draw conclusions from. However, the results have ranged over a wide area, and given the small sample size, there is no clear, singular factor that explains why some colors are in one grouping or another. Also, what was most surprising was not the dramatic jumps in dry time when colors were placed in the dark, but those cases where light levels or even the absence of light appeared to make no difference whatsoever. While pigments appear to play the central role in these differences, much more testing will be needed to understand how. And naturally, we are left with other questions as well: How do mixtures of different colors behave? Does layering one color over another make a difference? Are all the results similar under different lights – fluorescent, halogen, incandescent and LED? Is the presence or absence of UV important? These are some of the areas we hope to explore in the future, in addition to expanding the number of colors and types of pigments being tested.
Best Practices
While it is hard to construct best practices based on limited testing, it still seems reasonable to assume a few things that can help your studio practice:
- Paintings placed in the dark or in subdued lighting might dry significantly slower. This includes when paintings are placed in drying racks or turned against the wall.
- Conversely, paintings exposed to ample amounts of light should dry more quickly, although which types of light are the most effective still needs to be tested.
However, because pigments appear to have a large impact on the results, the above points are at best broad, general guidelines. Individual paintings are invariably complex, with multiple pigments being blended together and mixed with various mediums. Exactly how all of that impacts the drying times is an area that is just now being explored for the first time.
Hope this helps!
Happy Painting!