During a recent social media discussion, a colleague asked how I go about imaging my artwork. I responded that while I photograph works on occasion—I scan work far more often. I went on to say that rather than trying to explain how I image works in a series of comment fields, I would post a walkthrough here on smartermarx (the artist posing the question is also a member here.):
First, let me say that both imaging options for “2D” artworks have advantages and drawbacks. For example, the photography option can be seen as more advantageous than a scan when large-scale artwork is involved, when control of the illumination for imaging is desired, and when one may not desire to remove the artwork from a frame. Alternatively, a scan may be seen as more advantageous when the cost of the imaging process or equipment is of concern, when a higher-resolution image is desirable, and when the user has limited knowledge or experience where photography is concerned.
The topic of resolution does come up quite a bit in discussions of imaging options. Generally speaking, your scanning options will usually have far higher resolutions than would your digital camera.
For example, If we took a 4" x 6" photo and scanned it in at 600 dpi, we would get a digital image that is 2400 x 3600 pixels in size which is 8.6 megapixels. If we took an 8.5" x 11" photo and scanned it at 600 dpi, we would get a digital image that is 5100 x 6600 pixels in size, which is 33.6 megapixels. Given that many scanners today can go to at least an optical resolution of 3,200 dpi, scanning an 8.5" x 11" page at that resolution would result in a 27,200 x 35,200-pixel size image which is 957.4 megapixels.
We can also look backward, an 18-megapixel camera that takes photos with 5184 x 3456-pixel dimensions will resolve a 6" x 4" photo at 864 pixels per inch. If it took a photo of an 8.5" x 11" page, it would be resolving it at 406 pixels per inch. But again, you are likely to find a much better resolution with a scanner than with your digital camera.
What’s important to note though, is that higher-resolution does not necessarily mean a “better” image. For example, in the text above, I mentioned that a camera might hold an advantage when “control of the illumination for imaging is desired.” Many people are somewhat horrified to see that first glimpse of a scanned image in a preview window. This is often because the scanner illuminates the artwork via a light source orientation that is likely vastly different from how the artwork was illuminated at the easel. Whereas many light their studios/easels from above–allowing for a somewhat “raking” light to drape over the artwork—the light from a scanner is often near perpendicular, thus illuminating the image in a manner that is not conducive to the many decisions you have made under very different lighting conditions. However, such issues can be successfully compensated for with image editing software like Photoshop.
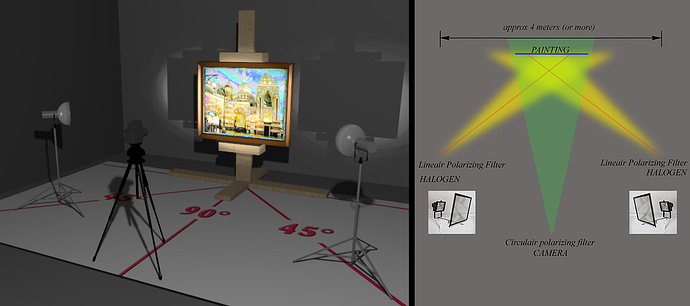
Now I would say that I have nothing to add to the standard “photographing artwork” tutorials that can be found online. Most people use some variation of this basic setup when photographing artwork:
Here are a few links that might be helpful:
I still think this is one of the best video guides for photographing artwork online:
In addition, we have another thread here that discusses some camera gear. It includes a nice breakdown of equipment by artist Slade Wheeler: Artwork Scanning/Photography Equipment and Processes?
Scanning artwork is fairly straightforward. Just like with the photography option though you can find a number of guides and walkthroughs online like this one:
I would think that my scanning to photo ratio is about 80-20% (I end up scanning about 80% of my works and photographing the other 20%.) This breakdown is often not influenced by size as I have no problem patching partials together. Instead, the heavy lifting in this breakdown is information quality. Whichever means seems to be less impactful to the intended visual information—that’s the way I go. Sometimes I will have an uneven sheen that is exacerbated by the illumination scheme of the scanner, and sometimes just too much detail is lost with the photograph. For some, the topography of the painting surface may make a scan impractical. Honestly, it’s a case by case call for me—but most often, it’s the scanner hands down.
Now, here some of the points I would like to stress if you are going the scanner route:
1. Whatever scanner you are going to use, make sure that you can turn off every single “enhancement” the scanner’s software has in play. Sometimes this means digging and digging into menus, but the results will be worth it. Some scanners have enhancements along the lines of brightness, clarity, sharpness, contrast, saturation, etc… just disable EVERYTHING you can. These programs often leave you with a host of problematic artifacts in the scans.
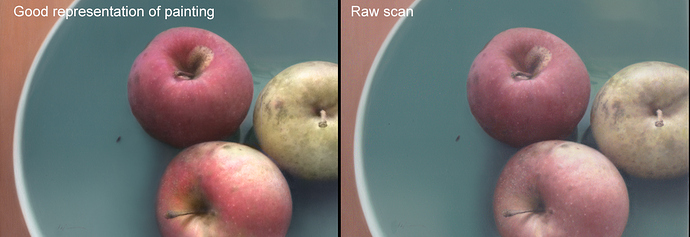
Here’s a look at a scan of a painting titled “Trifecta” I did a while back. This is before the surface was cleaned, so I used the tiny dust particulates as a focal point for this exercise. Look at how the scanner on the left handled the information with it’s built-in “enhancements” active. There is a host of bizarre color anomalies and artifacts that I would argue is compromising the visual information and, ultimately, the representation as a whole. On the right, you can see the hairs without all of the noise. For some, this level of noise may not seem to be a problem—but for those swimming in the seas of high-definition representationalism—these artifacts can aggregate into some serious issues:
The “raw,” non-enhanced scan will probably look washed out, low contrast, and low saturation. That’s fine, and a robust program like Photoshop can be used to correct the image in a “less-invasive” way that does not impact the visual information as harshly.
2. If the piece is larger than your scanning bed, carefully scan the work in pieces that overlap considerably. Scanners can yield “gutter distortions” so you will likely have to cut off distorted perimeter regions of the scans to piece them together as accurately as possible.
3. It is crucial to manually support the weight of a large artwork being scanned in pieces so that the entire weight of your work is not resting on some small part of a scanner. NO PART OF THE SCANNER SHOULD EVER BEAR THE WEIGHT OF THE ARTWORK. This could lead to serious damage to an artwork’s surface.
4. NEVER SLIDE YOUR ARTWORK ON THE SCANNER TO REPOSITION FOR A NEW SCAN. If an artwork needs to be re-positioned on the scanner, lift it away and lower straight without any sideways motion.
5. Always save the output in a format that can avoid problematic compression. If you can go TIFF instead of JPEG—do it!!!
There are my thoughts on the matter, and some resources that I hope can help. If you are interested, the scanner that I use here at the Ani academy is the Epson Perfection v600. Here are the specs if you would like to compare against one you may have your eye on:
Scanner Type: Flatbed color image scanner Optical Resolution: 6400 dpi Hardware Resolution: 6400 x 9600 dpi Maximum Resolution: 12,800 x 12,800 dpi Color Bit Depth: 48-bits per pixel internal / external Grayscale Bit Depth: 16-bits per pixel internal / external Effective Pixels: 54,400 x 74,880 (6400 dpi) Maximum Scan Area: * 8.5" x 11.7" * TPU: 2.7" x 9.5"
Light Source: ReadyScan® LED technology Scanning Speed:
- High-speed mode: 6400 dpi
- Color: 21.00 msec / line
- Monochrome: 21.00 msec / line
Optical Density: 3.4 Dmax
And the Amazon link:
https://www.amazon.com/Epson-Perfection-Negative-Document-Scanner/dp/B002OEBMRU/


