Language of Drawing - Gradation blocks

Hey Dawood!!!

It’s great to see you here—your gradation blocks are looking good. The tooth (crests and troughs) are often a great matter of concern for the artists engaged in these exercises. Pressure, stroke direction, point maintenance, application pitch, alternating from spot fixing to sweeping applications, etc…all contribute to not only marks that aggregate into perceptions of smooth value transitions—but also to a controlled surface that is highly conducive to the aforementioned functionality of the material.

Also keep in mind that the drawing program is designed to lay the groundwork for painting. Just as with the tooth of the paper, painting will have you dealing with substrate/ground textures, a highly-varied paint layer topography, and a host of varied drying times. As such, learning to deal with the surface of a drawing is another great preparatory precursor for painting.

Lastly, it’s always difficult to productively analyze surface quality in scenarios like this. Most photograph at a distance to see the overall gradation leaving the surface quality more difficult to assess. Scanning is a more useful option here in one sense, but the change from more raking light found with an easel scenario to the perpendicular illumination if a scanner can also lead to misleading results. To assist here, we’ve added some high-resolution images of exercises, including gradation blocks. You can use these to compare with your results.

They can be found here: Language of Drawing Exercise Collection

The surfaces you can find there can help you to appreciate just how “clean and controlled” these should be.

2 Likes

@AWaichulis
hello Anthony, thank you for taking time out and giving feedback, it’s really appreciated.
I agree taking photos with the phone tends to increase the contrast and lessen the gradations alittle. The examples are helpful for sure and I can’t even fathom the nuances it takes to refine the gradations to the level in the examples, but i’m trying.
With all the variables at play such as angle of application, pressure control, pendulum, the biggest challenge I am finding is understanding the sequence of application.
Eg, I think I understand now that the pendulum sequence is to apply a light, then medium pressure to address the troughs.

1 Like

I wanted to also add this. It’s a post I made on Facebook as a follow-up to another I made regarding the fundamental role of disparity in many drawing/painting efforts. It’s definitely applicable here:

Just a bit of a follow up on the role of disparity in a cognitive framework for tackling value transitions:
Within many representational drawing efforts, we tend to initially look at passages that contain gradations with categorical perception—abstracting and “chunking” it into regions defined by major and minor perceptual relationships. We might therefore perceive the attached section of one of our Gradation Block exercises as (A) a light region, (B) a transitional region, and © a dark region. These overall categories are bound by what we might describe as significant or “major” disparities.

Many often assign form-based anatomical terms to the categorical areas that are often perceptually or conceptually experienced as relatively homogenous (e.g., light, middle tone, half-tone, local color, local value, shadow, terminator, etc.)

However, what we describe as a transitional region here (often described by others as a “turning,” “rolling,” or “graded” region) tends to be seen as something quite different. The criteria for this designation tend to be a series of perceptible disparities (i.e., (noticeably non-homogenous) that are “lesser” or more “minor” in magnitude when compared to the more major categorical disparity breakdown mentioned above.

One way that we navigate such transitional regions (in the context of value) here at the studio is in terms of range and rate. For example, when preparing to execute one of the value transitions found in our gradation block exercises, we first identify a path or axis that spans the transitionary region in the direction of the greatest successive minor disparities. Then, based on this path and the perceived boundaries of the transitionary region, we identify specific value limits (i.e., the range – the perceived difference between the lightest light and darkest dark along the transitionary path—usually described as anchors in many of our efforts). Next, we evaluate how much change is perceived per applicable unit of distance* along the established transitionary path (i.e., rate.) To this second point, we also must consider the nature or variability of this rate (e.g., linear vs. non-linear.) I find that with this cognitive framework and evaluation at the onset, artists can more effectively toss some of that working memory over to issues like surface control instead of placing all of those eggs in the visual short-term memory basket.

*Applicable units of distance here would be relative to the desired level of resolution.

Definitely try to get the finish as absolutely polished as you can. It can be incredibly frustrating at times, or even seem Sisyphean in nature, but you can do it and the control that comes from the exercise is invaluable.

that’s very helpful, thank you :slight_smile: keeping at it. Sometimes getting your had to do what your brain thinks/sees/wants is the challenge.

1 Like

Great questions all.

Do you visualize the transitional phase by masking the other parts or by making marks?

There is a difference between visualizing and creating the actual representation of the transitional phase. My initial categorical perception is just how I perceive the transition. To better understand this—consider these two continuums --one of a section of the electromagnetic spectrum and another of brightness/value. Whereas we might see the latter as an even evolution–the former, also an evolution, is often initially perceived in terms of “chunks” or categories (green/yellow/orange, red, etc…)

Continuums

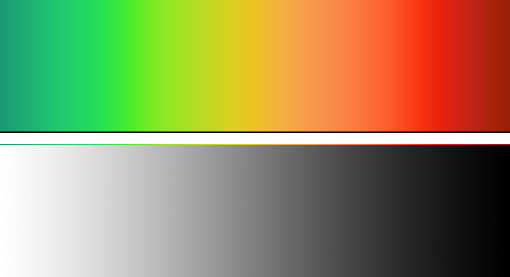
I find that this type of categorical chunking takes place when I am first examining a passage as shown above. I see two homogenous regions and a transitional region (more similar to the green, yellow, orange, etc…) It’s just the way my brain finds the most useful information based on my experiences (lifetime and evolutionarily.)

This perception is not the same as how I would execute this (although the process is shaped by the perception.) To mimic the passage seen in the post above I would absolutely establish the anchors that the transition is bound by. No masking would be required as I would actually require the contextual influence of the anchors to better gauge the factors that define the transition.

How do you evaluate concretely the rate of change?

While we cannot objectively determine an absolute lightness visually (our visual system does not work that way), there are many steps we can take to try to emulate the value relationships we experience (a sort of solving for “x” with limited information.) One way is with dynamic squinting which is described here: Scan, Stereo and Squint

Do you suggest diminishing the role of visual short-term memory because you rely more at one point on the parameters you have established before than on comparison side by side which might throw you off (absolute comparison?)

That can definitely be a good strategy. I wouldn’t say that there is any Goldilocks zone to an ideal conceptual and VSTM balance as such an ideal would necessarily be shaped by a goal and chosen process. I do however place emphasis on the conceptual when I am trying to either abstract or to peak-shift something for effect. On the other hand, I place a great deal of emphasis on VSTM when I need to police some of the abstracted imprecision that comes along with an LTM conceptual framework. It’s like I’d obviously rely more on a hammer when more nails are required for a project than screws. It’s just a matter of what is required relative to my intent.

Finally, how do you manage the level of resolution (make smaller and smaller extracts of transitional phases like a recursive procedure)? Knowing that in a real drawing transitional phases can be all over the place in all directions, how do reunify things so as not to get a broken effect?

I believe that this comes with experience. Bringing seemingly disconnected, independently developed sub-units back together can take a great deal of work. In my own process, I let an overall goal of “arrival” govern my process. What I mean by this—for a simple example—I know that if I worked by establishing a long sequence of discreet values for the following gradation, and then tried to tie them together into an evenly-evolving gestalt—it could be a massive amount of work with many likely problems.

Continuums1

Rather, what I would do is establish anchors and begin with a long, overshot anticipatory taper of dark that is meant to receive a long taper of white. I know through experience how dark to go and how far so that an appropriate, subsequent application of white will have the representation “arrive” as intended. So you see, the unification process, for me, is “built in” to the application process. It can easily be seen as unintuitive. This is why we have the gradation block exercise so early in our program–so that artists can understand the parameters of the materials–and how to deploy a strategic sequence of material applications and manipulations so as to facilitate the “arrival” of the appropriate (unified) result.

Here is an image of a gradation block being created in this way (however the initial taper is added prior to the white anchor.) :

3403d2fc414ad21c3a61a243b49647bb8dcc27af_2_500x500

Hope this helps!

2 Likes

@AWaichulis
Hello Anthony, and everyone else :slight_smile: hope all’s well.
Did a couple more gradations blocks and really struggled with the last one and was hoping you could provide some insight. (sorry for the bad pic)
1

2

I really struggled with 2 mainly because of the angles and the pressure control and feel like I messed the paper up early on. I feel my biggest issue is getting comfortable physically and am trying between (using eazle) sitting, standing and using mahl stick or not. As well, i’m struggling with blending the two materials together when it’s a really quick or subtle shift out of black or into white as you see in 2.

Here is the setup for it, feel like maybe it should be much cleaner at this stage too?

any tips or things i could try are greatly appreciated.

1 Like

Hello Dawood,

I can’t offer you any advice, but I just wanted to say that I’m really enjoying seeing your progress!
I started LoD myself today, and plan to start posting soon as well.

Keep up the good work and please do keep on posting your progress…!!

Simon

@SiBreen hello Simon, thank you for the encouragement! :slight_smile: will keep posting and looking forward to seeing your progress as well.

Just to encourage you man, keep going

Hey Dawood! The structure of these gradation blocks is looking really good. There are some issues I would address regarding the surface. Here’s a quick video to explain–please let me know if what I am saying here is not clear in any way.

Also, it is very normal to experiment with standing, sitting, mahlsticks use, etc. This is the time to engage in that type of experimentation. You REALLY want to take your time with these and make sure that you are building up some truly advantageous automaticity. Many try and rush these early exercises to get to the more “fun stuff,” only to realize later that the fun stuff isn’t coming out as they had hoped. These early exercises will do much of the heavy lifting where later success is concerned. Take your time!

Image from the video:

1 Like

@AWaichulis
Hey Anthony, that makes a ton of sense, thank you sooo much for taking time out time to explain. I really appreciate it.
If I understand correctly, being overly dominant with a stroke direction (stroke prominence) leads to build of material on the crests (causing cast shadows in the valleys) of the troughs and to avoid this it is recommended to vary stroke direction to fill the organic nature of the paper in an uniform manner.

1 Like

Yes—stroke prominence and the promotion of bothersome crest-trough contrast go hand in hand. Take the time intermittently spot fix" troughs in between larger applications. In other words—alternate between larger, various direction sweeping applications and small “spot fixes” to try and cultivate a very smooth surface that will leave little to no trace of stroke prominence or noticeable crest-trough value contrasts.

ok awesome, this helps a ton! thank you :slight_smile:
back to the drawing board…

1 Like


@AWaichulis
Hello Anthony, me again :slight_smile:
I’ve tried to go in and refine the pits, but feels like everytime I add a layer it creates more pits, especially when I go into the terminator. I think it’s better but still having the issues. I do see exactly what you mean in the example you provided and how smooth and even it all is.

1 Like


another one, this is very hard lol

1 Like

LOL! Yes–these are defintiely meant to be challenging. Keep trying to push yourself further than you think you can go in terms of gradation resolution and surface evenness. The slower and more thoughtfully you can do these, the more efficiently you will more through later challenges.

haven’t posted in a while but here is another gradation block pattern.

1 Like

The overall structure looks really good Dawood! Can you see if you can get a close-up image showing more of the surface?

Hello @AWaichulis thanks! :slight_smile: tried to get closer pic.

I’m still working on the surface treatment how you mentioned.

1 Like