
Artist and Smartermarx community member Sigrid Junold Käppeler brought up the practice of developing needle-like pencil points the other day in a post titled “Frightfully pointy pencils.” While I was in college I was told that this was the “ideal” way to sharpen pencils–but alas, I was never provided with what I would call a great explanation as to why. So I thought that this might be a fun little exploration to nail down some of the actual reasons for creating and using these “frightfully” point pencils.
(Note: I would like to be clear that our exploration involved only one brand of graphite pencil, in a narrow range of grades. Although I do not feel that this impacts my conclusions or statements here in any significant way, I would love to hear from you if you can demonstrate otherwise.)
For those that may not be familiar with this pencil sharpening technique, here is a how-to from the Sadie Valeri Atelier:
(You can find a great number of videos regarding this type of pencil sharpening process with a quick search on youtube.)
I started my exploration by reaching out to colleagues on social media with the following post: “Hey guys/gals—I’m working on a short write-up on pencil points (charcoal/pastel/graphite.). I know that quite a few of you out there work with these very “needle-like” points. Would anyone like to share the advantages of this? A few advantages seem obvious, but I’d appreciate any insight that anyone can offer.”
Within about 24 hours there were about 90+ comments (some of them my own looking for additional information, clarification, etc.) Of the many contributions, I would have to say that one of my favorites was this short anecdote from colleague Carl Dobsky. He wrote, "I remember sharpening pencils like that when I was at the Water St. Atelier. I did it because I wanted to be a good student and that’s the way everyone was sharpening their pencils. One day, Jacob came in and picked one of my pencils up and said, “that’s so cool how you guys sharpen your pencils.” “What do you do?”, I asked. “Oh, I use an electric pencil sharpener.”
In addition to the comments, many were eager to share images of their pencil point preferences. Here’s a few along with some that I pulled from different FB and Instagram pages:

Here are a few of the top reasons that were put forward for the “needle points”:
Provides/forces thinner/finer lines.
Requires less sharpening.
Develops pressure sensitivity.
Develops pressure control.
Allows for "drawing from the shoulder."
Reduces some of the occlusion that one may encounter due to the pencil casing.
Forces people to work with lighter pressure due to “lead” fragility.
Provides greater weight variation which may, in turn, provide a greater kinship to painting.
Develops patience.
Fills tooth troughs with material.
Allows for more “graceful” drawing.
Increased “preciseness.” and control.
So let’s look at each one:
Provides/forces thinner/finer lines.
This seems to be a valid claim based on some of the limited testing we have done here in the AAAW studio. Although I am not sure if the difference is truly noticeable amid most drawing endeavors. Here, we can see the difference between a point created by a School Smart Vertical Electric Pencil Sharpener (left) and the point created by the sharpening technique demonstrated above (middle.) The image on the right shows an overlay for better comparison. The images here are 20x magnification taken with a Bodelin ProScope Micro Mobile.

As you can see—the sharpener we used does not have the point that the needle technique yields. However, as we begin to make light pressure lines on a drawing paper (Strathmore 400 Series Recycled Drawing Paper), we can see the difference in line width (A). However, after 10 seconds of continuous, equal line work–the point on the left seemed to erode down into something slightly finer—becoming closer to the line quality of the right (B). (Again, 20X magnification used here.)

Electric Sharper on left - Utility knife and Sandpaper on right.
As such, while the claim is true–I do not think that many would be able to discern the difference during most drawing endeavors (C).
Requires less sharpening.
True. We would hit wood casing with our electrically sharpened pencils loooong before the needle point’s useful mark making ability would be lost. However, it is fair to mention that this might “wash” out a bit over time as, on average, the time requirements for the blade and sandpaper route takes much longer than the manual or electric sharpener route.
Develops pressure sensitivity.
Partially true (Sort of). This idea is often confused or conflated with pressure control. However, they are very different concepts. Pressure sensitivity (or perhaps more appropriately haptic acuity) suggests an input while pressure control suggests an output. While these abilities are indeed intertwined during a drawing endeavor- we will address them as separate issues here.
To better assess the pressure sensitivity claim in this context, we need to be clear that, generally speaking, a vibration will be carried far more effectively by something rigid as opposed to something more pliable. If an artist is using the needle point, it is far more likely that he or she would be using a more rigid material as the risk of breaking leads during sharpening and use increases with a decrease in binder content. As such, artists transitioning to the more frequent use of harder leads may feel an increase in mechanosensory input that may be quickly interpreted as increased sensitivity.
Now I would argue that this increase in mechanosensory input can be incredibly advantageous for teachers so that they may more easily introduce the role of such feedback in drawing and painting endeavors. It’s easy to introduce a new concept or idea if it is something that it can be clearly perceived or experienced by the student. In this sense, YES, the hard lead needle point may help to develop pressure sensitivity. However, in another sense, it is a problematic misrepresentation. In a sense, it is like claiming that turning up the music in your car means that you’ve developed an increased sensitivity to sound.
As with the development of any other skill, finding improvement in discrimination tasks requires a practice routine that introduces strategic increases in challenge. Therefore, if your goal is to increase your pressure sensitivity, that is to say, to increase haptic acuity–then one would want to be effectively moving towards higher levels of resolution, decreased contrast, and/or a larger continuum to find increasing challenge. For many, it is more difficult to gauge pressure via mechanosensory input with soft, low binder content materials as the haptic feedback is more attenuated. Furthermore, due to fragility, the range of haptic feedback made available through needle point use is often much smaller than what may be experienced with shorter points. With these facts in mind, I would argue that the shorter point, softer material is far more advantageous for developing haptic acuity—or “pressure sensitivity.”
Develops pressure control/Forces people to work with lighter pressure due to “lead” fragility.
Again, Partially true (Sort of.) and True. Many are quick to toss out the former claim here by citing the latter, so I combined these two. And yes, I would absolutely agree with the idea that needle points can be used to effectively police heavy-handedness. However, just as we saw with pressure sensitivity/haptic acuity, if the goal is to increase your pressure control, one would want to be effectively moving towards finer resolutions, decreased contrast, and/or a larger continuum to find increasing challenge. And let’s not forget that the quality and impact of your line can be used to police pressure as well.
Allows for "drawing from the shoulder."
Misleading. The implication here is that one is not able to as effectively or efficiently draw from the shoulder with a non-needle point. As you can probably imagine—this is just not true.
Reduces some of the occlusion that one may encounter due to the pencil casing.
True. While I am sure that you can find a wide range of disparities depending upon pencil type, material, brand, grade, etc. we looked at a Staedtler Mars Lumograph HB with our iGaging EZ Cal Fractional Digitial Caliper to examine the disparity.

The exposed lead is 2.02mm in diameter while the wood casing is 7.36mm. Therefore, sharpening in this way may reduce potential occlusion by the drawing tool, in this case, by 5.34 millimeters. (You can get an idea of what 5mm is by looking at the dime comparison inset.) I mean, we really didn’t need to test this one, but it gave us a reason for us to bust out the digital caliper. 
Provides greater weight variation which may, in turn, provide a greater kinship to painting.
Absolutely True. This is the feature that I find most attractive about the needle point. With the amount of lead exposed, you can get really close to a broadside stroke from a thin line quite effectively. No argument here.

Lowest angle with our needle point.
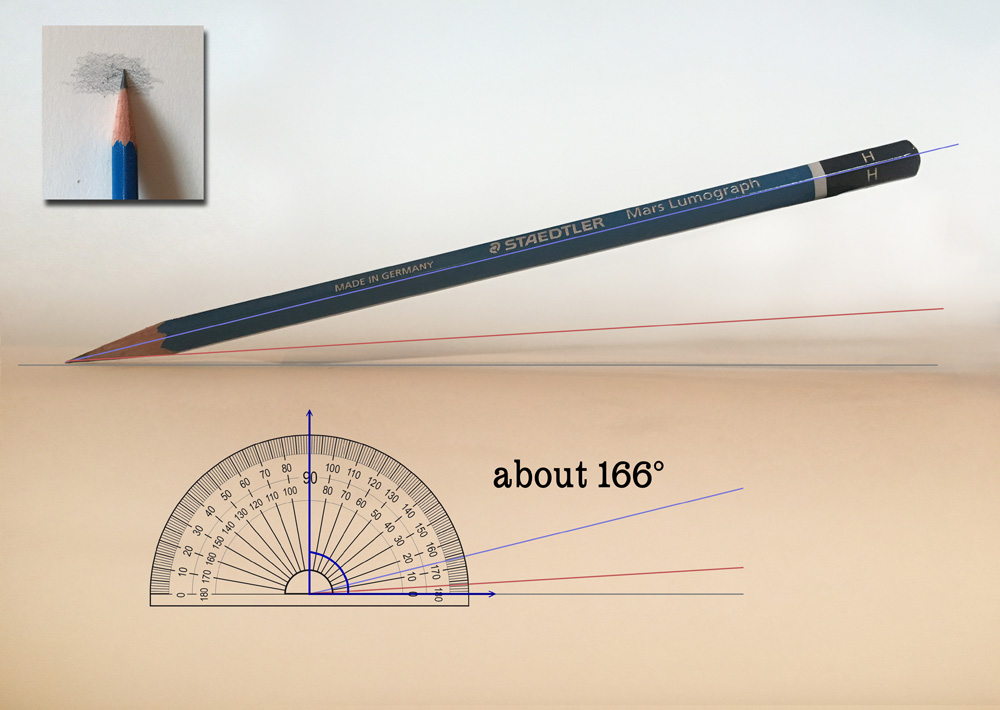
Lowest angle with the electric sharpener point.

Develops patience.
True I guess. However, if you are involved in actual deliberate practice where drawing and painting is concerned, I would assume that you have ample opportunity to develop patience.
Fills tooth troughs with material.
True but misleading. While it is true that harder materials that can be sharpened to a fine point are far more effective in pushing material from the crests of a paper’s tooth to the troughs-there is nothing that prevents a manual or electrically sharpened pencil from doing this exact same thing. Now one can indeed argue that because the needle point can be brought to a finer tip, it would be more effective in this context–however, I would argue that any such potential advantage may be diminished with the pressure ceiling on the more fragile needle point.
UPDATE: There is a great demo below from @sigrid showing how the finer tip with graphite did produce a less grainy result with a tonal drawing right out of the gate.
Allows for more “graceful” drawing.
Wildly Nebulous and Subjective. Unless you are assigning the potential for greater line weight variation as a vital piece of criteria for grace–this is too nebulous and subjective a statement to be useful here. If you are unclear as to why I would recommend you listen to my episode of Suggested Donation in which Tony Curanaj tries to comically introduce “brush stroke energy” into the conversation.
Increased “preciseness.” and control.
False and True. To understand this claim we need to be clear as to what precision means (relative to accuracy as these are often used colloquially as synonyms.) Accuracy refers to the closeness of a measured value to a standard or known value. For example, if in the lab you obtain a weight measurement of 3.2 kg for a given substance, but the actual or known weight is 10 kg, then your measurement is not accurate. In this case, your measurement is not close to the known value.
Precision refers to the closeness of two or more measurements to each other. Using the example above, if you weigh a given substance five times, and get 3.2 kg each time, then your measurement is very precise. Precision is independent of accuracy. You can be very precise but inaccurate, as described above. You can also be accurate but imprecise. For example, if on average, your measurements for a given substance are close to the known value, but the measurements are far from each other, then you have accuracy without precision.
A good analogy for understanding accuracy and precision is to imagine a basketball player shooting baskets. If the player shoots with accuracy, his aim will always take the ball close to or into the basket. If the player shoots with precision, his aim will always take the ball to the same location which may or may not be close to the basket. A good player will be both accurate and precise by shooting the ball the same way each time and each time making it in the basket.
I am not 100% sure what is meant here, but I think in many cases it would be untrue to claim that the needle point automatically makes anyone more accurate OR precise.
Now as to control—in addition to what was mentioned above in terms of pressure control, I would emphasize that the lower pressure ceiling on the needle point keeps the artist in a smaller arena or continuum. As such, this may grant the artist a greater amount of demonstrable control within those parameters. However, this is increased control via a reduction in variables that may present the challenges that lead to actual skill development.
A few other advantages for the needle point that were put forward included a physical deterrent from choking-up on the pencil point (which may ACTUALLY contribute to a promotion for drawing from the shoulder instead of the wrist.), a means by which to better keep graphite away from the artist’s hands, and for those that are adamant about the 1 inch of exposed lead–perhaps a tool for measurement. All good points in my opinion (pun intended.)
So, in the end, there are indeed good reasons for choosing to go with the needle point. It offers some good advantages but as with all of the other choices we make, brings with it some potential disadvantages as well. Regardless, I think it is important that we all keep carefully evaluating the claims that are made in regards to our materials and techniques. It’s good to be skeptical as the practice can illuminate which paths may best lead us to our creative goals efficiently and effectively.
Happy Drawing and Painting my friends!
 ) Quite a few people brought up the mechanical pencil option during my examination of this topic. I’m not sure why some find the wood-cased pencil more attractive for this. Perhaps some perceive the mechanical pencils as carrying some sense of “modernity” that, as “traditionalists”, they find unattractive. I’m really not sure. If there is a pragmatic reason, perhaps someone will share it here.
 thanks so much, Anthony
  So, using a new “regular” HB straight from the box, I drew the cone on the left. After whittling and sharpening, I drew the cone on the right. I did try to be impartial and to expend equal effort on both. The one on the right does seem less grainy…


 they also write that, as of 2nd quarter 2019, they will be offering solid graphite pencils (ike the progresso solid graphite pencils) in lumograph 100 quality with diameter 6.8 mm, in HB/B/2B/3B/4B/5B/6B/7B and 8B, as well as three water-soluble pencils in 4B, 6B and 8B. you heard it here first!
