really enjoyed the shape reps, will no doubt continue doing the odd bargue redux in between times/when I’m stuck for something to draw. so, starting on pressure scales today. did a half sheet front and back to double check I’m not doing anything wildly wrong before I start nailing the big sheets.
i began on the rough side of the paper and fought with the graininess a little:-
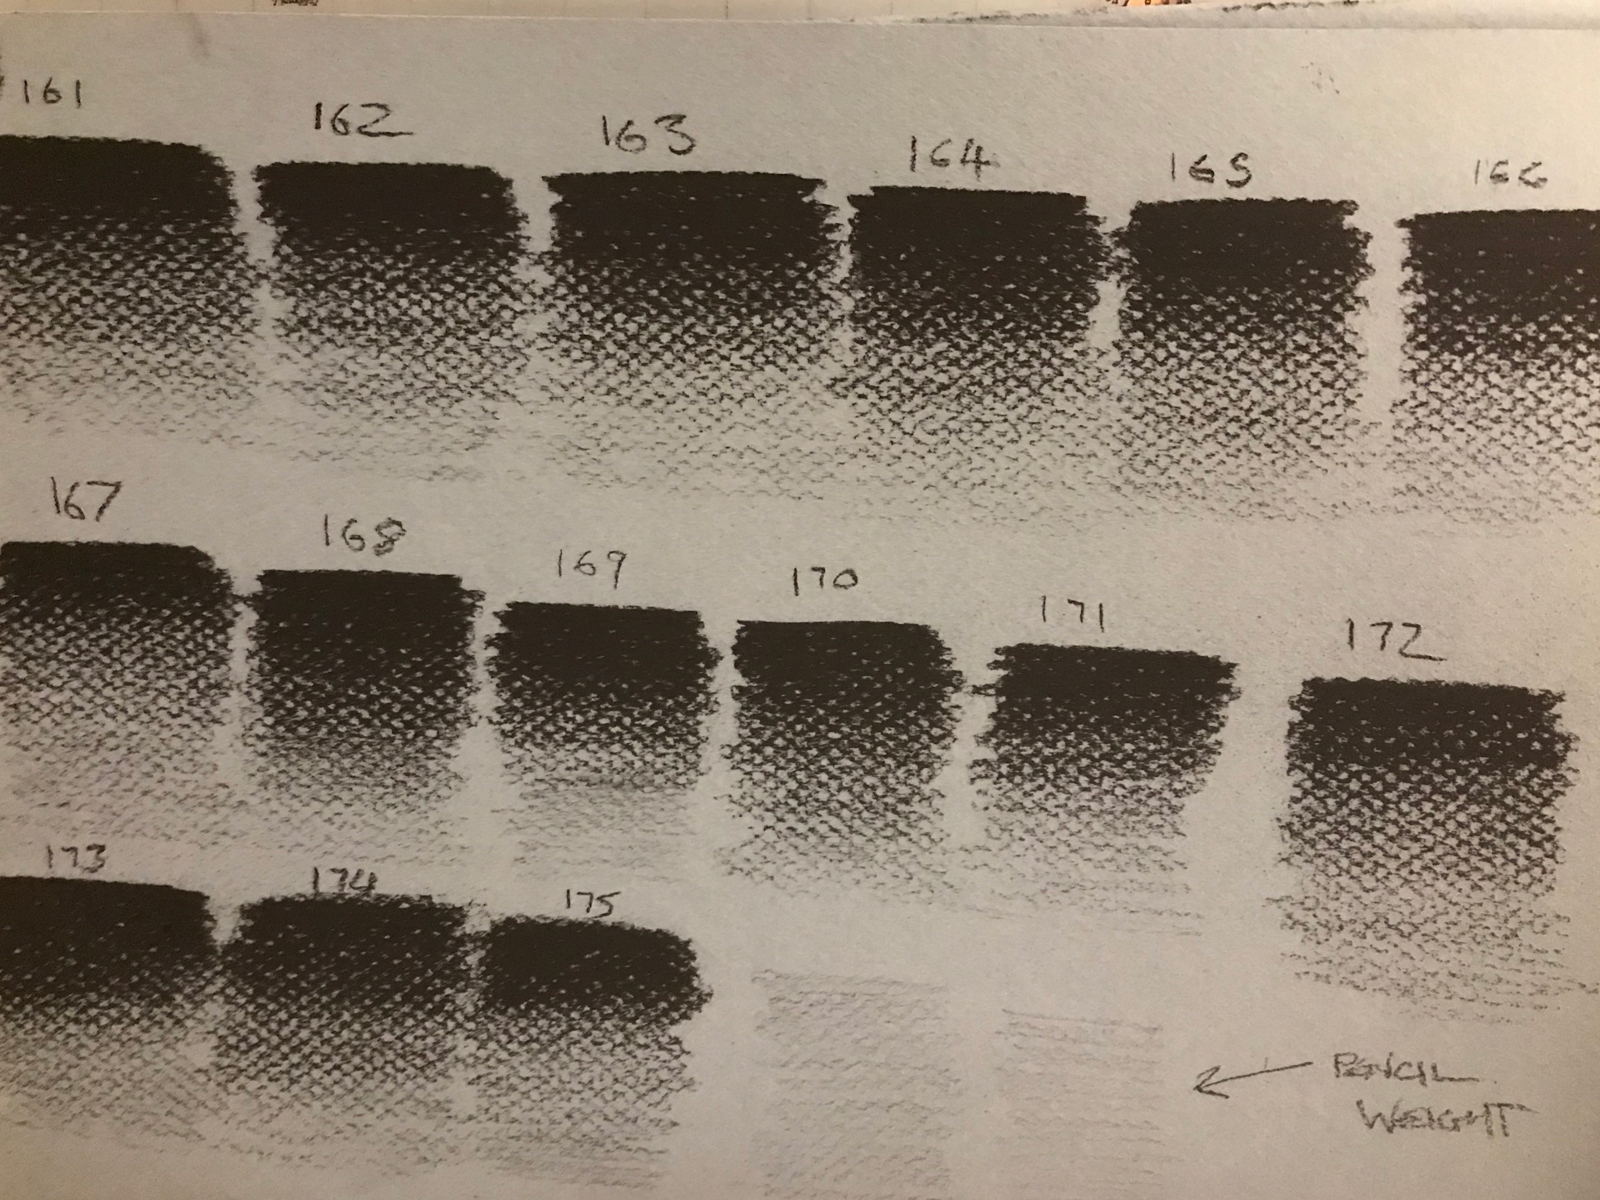
i’m never 100% how far down to take the really black dark before I start fading it out. any thoughts/observations you have on anything you see here are very welcome!
These excersises are so invaluable for learning control. I’m doing them as well. I like the way you’ve numbered them. How do you find the rough side vs the smooth side?
with me working left half/right half i didn’t want to mix up earlier attempts and assume i went straight left to right across the whole sheet. hence numbering. it’s also easier to reference (51 is decent for example) and if i was so inclined i could even work out some statistics across a sample if i thought i needed to analyse my consistency or progress or something.
i like the look of the textured side, but it does seem impractical to me to use that if i wanted to get any crisp details on it. how do you find the surfaces and what do you prefer?
Good morning Martin—It does not look like you are having an issue with the darker end. Many don’t get as dark as possible for fear of being able to transition out. The issues that I see involve range and rate. First, while the dark end IS well established—you are still far from getting as light as possible. Sometimes this is simply a matter of you not being aware of what the lightest range “feels” like. Here’s a short video on building up to consistent light tapers:
Second, your rate is being governed by the first change out of the extreme dark. This rate is then challenged by an inability to get light enough and a sort of “battle” ensues. When you transition from the dark–you seem to be doing it far too quickly. This quick change sets a rate that the practitioner is forced to build an even evolution. Instead try to slow your evolution out of the dark (more like what you have with 66 and 118)
These are the things that you need to focus on to find improvement. If you are not sure of an issue or are waiting on feedback to move forward (obviously I get swamped from time to time and am unable to provide feedback in the most timely manner)—please shoot me an email at yychuls@gmail.com. Continue to post the issues here as they help many—but sending me an email nudge alerts me to someone waiting.
Thanks for your input and encouragement as always Anthony!
I think I was fixating on the 1.5"-2.5" inch taper and running out of room trying to compress the whole value range into that space (having gone hell for leather and wasted a chunk of it on the black bit).
I see exactly what you mean with the lightest range, and that video is a good help. In practice tonight I still haven’t homed in on why I suck at this, I was able to get barely perceptible lines during the origin/destination exercises but I can’t seem to get anywhere near that light now. Even with no pressure at all - just allowing for the weight of the pencil leaves a visible black mark. I can do this on normal paper with a pencil and leave no mark at all.
to the right of 145 on the picture below I went for pure lightness and no gradient, the bit I’ve circled is as light as I could go, and as soon as I hit that I tend to stop, I should probably carry that value on a bit longer on my tapers for ease of visibility.
This is zoomed a bit closer so you can see my problems more clearly, after 175, I went with some delicate pencil drags with no pressure applied to see if I was going as light as I could, and I seem to be at present. The camera tends to darken these somewhat, but they should still barely be visible as far as I’m concerned, and they’re far from it.
Hopefully the next non bumpy side of paper might help me a little, I could do with this on an easel also, but not had the option at the moment, I’ve had to do this bent over with the drawing board flat on the floor, but I’m being so careful I don’t think that’s the problem. Will sort that out to eliminate that as a possibility.
These were much easier on the easel (vertical), I had far more control and was considering the pressure exerted down my whole arm rather than just focussing on what the tip of the pencil was doing. Still patchy (the photo seems to exaggerate the contrast too, but what the hey) but I can see improvement!
Will do the other half of the sheet as soon as I get the chance.
I’ve circled the particularly nasty bits, there are far more I know. I started to make the tails longer toward the end to give me more chance to develop and extend the lightest pressure section. The final two I’m happiest with so far, the light bits are noticeably lighter in real life than the photo suggests - i’m basically hovering over the paper with the pencil at this point in the scale, i can’t get lighter without totally leaving the surface.
i need better easel lighting really as it makes the top left look light and the bottom right look dark in the photo. the bottom right is much better than the top left, honest!
Had far more success tonight, this post (with video!) was particularly invaluable for anyone else sucking at pressure scales:-
I’m on the bumpy side of the paper here but it didn’t seem to put me off as much this time. The photo/lighting was slightly kinder to me this time too, this is more accurate in contrast.
I got into a real flow doing these, making incremental adjustments with whatever I wasn’t happy with on the previous scale and mostly improving down the board, the one I was most pleased with is marked with the arrow near the end.
I worked on another side of paper tonight, I notice now I could have probably pushed the darker section of the scale further in general here, but the smoothness of the value tapers is at least consistent, and I was keen to concentrate on the lighter end of the scale where I’ve had the most trouble.
These tapers are SOOOOOOOOO much better Martin. You have the range for sure—not you just need to stretch out the top so it matches the rate of the rest of the scale (in other words–the change from black to your mid-level values is faster than the mid to end.) This is SUPER common.
Thinking of your scales last night I snapped a quick pic of one of the apprentices here doing scales. He was on the rougher side of the paper so you can get an even better idea of the evolution of pressure relative to the robust surface texture.
I didn’t have too much time but simply had to try some tonight. I could maybe still go a tad further down with the darker range when compared to the example you posted.
Hopefully i’ll get to fill the full sheet tomorrow
A bit of experimentation on this sheet, I made them a tiny bit narrower and closer together so I could fit more on the paper. A noticeable improvement in range, balance and confidence now. My speed down the taper is consistent now too! (earlier I was slowing down a LOT for the light bit), but not any more
back on it now after the break had a little time so did a couple of full rows across one of the big sheets (smooth side), keeping them pretty close together to get more out of the paper, starting to acquire quite a pile of tiny worn down generals pencils too. here’s a small section, will hopefully finish this sheet tomorrow.
Took a while to fill the bumpy side due to work commitments and other rubbish. Starting to slowly understand everything I was doing wrong along the way with this exercise. Really has me working hard this one.
close-up of a section so you can check I’m not still messing up:-
I don’t know how I missed commenting on these most recent ones Martin. They are awesome. I think it’s time to venture into the white my friend. Onward and upward!